Showing posts with label diy. Show all posts

DIY antlers? only in wisconsin, only with me...

during a recent winter hike through the woods, i was lucky enough to stumble upon an antler when i took a turn off the beaten path. after what seemed to be a creatively uninspiring winter, this was just enough to spark a little excitement and get my formerly frozen artistic juices flowing once again! yes, i get amused by the smallest things, don't judge me. ;P

this unexpected discovery was definitely something special, representative of typical sconnielife, that i wanted to proudly display. however, rather than just a bare lone shed i wanted to jazz it up - and from there, the ideas were endless. #firstworldproblems, at its finest!


when i couldn't fully commit on a single creative direction to take it in, i realized it was because i appreciated it too much as it naturally was and didn't want to risk potentially botching it if my project went awry. the problem-solver in me then asked myself: i wonder if i can just make my own sheds?

the thought of crafting my own sheds for the purpose of "art" was still meandering inside my head with fresh tracks while i was in my kitchen making dinner that evening. and like the cliche eureka moments we don't hear enough about, it was then and there when i looked at my jar of all-purpose flour where everything hit me like a ton of bricks! and what seemed to have been just an idea minutes earlier now became a feasible project to try immediately!

in all honesty, i really didn't think it through too much before i was taken over with inspiration and found myself tearing strips of newspaper for the next steps. yes, i was doing all of this as i was waiting for my dinner to finish cooking. using only the supplies i had on hand, aluminum foil and masking tape were how i created the basic shape for my pair of antlers - referencing my actual horn. with the strips of newspaper and a water + flour mix (see me being resourceful? :) i paper mache'd both antlers reinforcing the structure and had it complete and ready to dry before my dinner was even ready! easy peasy! not to mention, this was a good place to stop for the night because it was as far as i had thought about. smh, lols.


a few nights later, once they had completely dried, i once again found myself inspired to continue. they weren't looking too bad either, which helped! haha. figuring out the next step as i stared at it, i decided to knead a flour + hot water dough and use it as a paste to cover and smooth out the texture from the paper mache. and, once again, WOW! it couldn't have worked any better!


once that layer dried, several days later, i sanded down any rough spots on the antlers until it was smooth... and it was really starting to look and feel like the real thing, now more than ever! if i were excited before, i was ecstatic by now! haha. i didn't stop here though; i was too inspired by now to half-ass it any more, so with the help of a hot glue gun, i started to imitate the texture visible by the base of the horns in another attempt to continue to make it as realistic as i could. once i was happy with that, i mixed white and brown acryllic paint until it reached a comparable shade to that of my actual horn and painted the craft antlers... also detailing it with hints of brown and white for dimension after the first few layers dried. incredibly nerdy, but i couldn't be more proud of the end products - and the "let's try this" approach!


...now, i just need to find where i want to display them in order to add the last finishing touch - coordinating/color block painting them to match! stay tuned! ;D


...welcome baby zaya! she's finally here!

it's official; all my friends are now married with child(ren)! ;D earlier in february, a wonderful group of us hosted a babyshower for my best friend... and at 11:24pm on march 7th we welcomed our beautiful little girl into the world! how incredibly exciting for the next chapters in each of our lives. <3


DIY wine coozy :) how fun!

some people enjoy winding down to tv. others might do it by going out... but all i need is good music, a glass of wine and inspiration :) i stumbled upon this wine coozy idea a few weeks ago and thought: genius... and cute!

it also makes for a more personal companion when gifting your favorite bottle - and the best part, you can skip the wine bag and/or bow... and customize it any way you see fit! definitely in my realm... and most definitely a dorothy project!

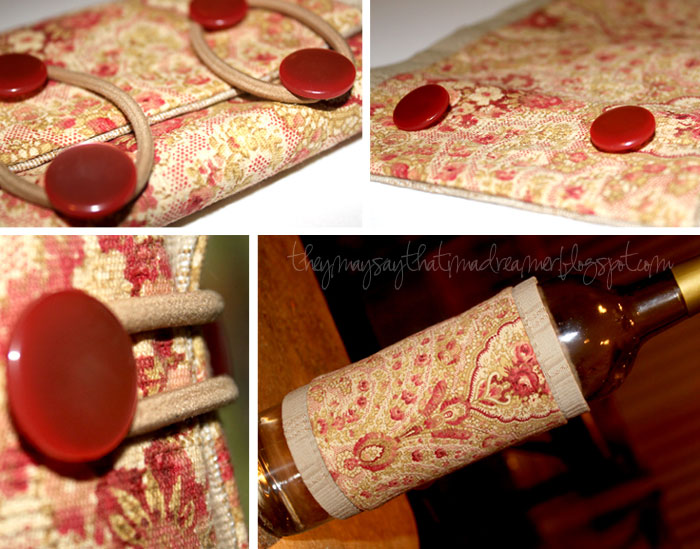
this tutorial i followed is pretty simple and straightforward. using leftover fabric, i found a coordinating print from my stash to balance out the girly pink! the hardest part was probably deciding whether i wanted to use my pink buttons, or the gold ones! hha.

there were also a few "tweaks" between my cozy and the original that is worth noting though...
1) i didn't need to use batting because my coordinating fabric was thick enough.
2) instead of using two buttons, i had a set of four i wanted to integrate and found it secured much better in two points, versus one... as well as looked neater too.
3) rather than fastening with twine or cord, i used two coordinating NEW hair ties and it was the perfect touch to bring it full circle; literally! talk about a minimalistic approach to re-purposing! i'm a happy girl right now! (i'm doing a happy dance too, haha.)

practical. useful. and easy! but most of all, so darling cute!


and it was such a totally simple and rad diy - i made another one! ahah.

RECIPE: banh cuon

when i'm stressed, all i can think about is cooking! and if there's anything i make on a regular basis, it's my favorite - banh cuon aka fawm kauv! simple, cheap and comforting... though meticulous in execution! but it definitely doesn't hurt that find complete therapeutic enjoyment in the latter! this wasn't always the case though. for me, the learning curve was pretty steep..!

because this dish is pretty time consuming, they're not very popular or common on menus - regardless of the plethora of asian restaurants you may have at your disposal. and even when they are, i felt like they're half-assed... where due diligence just isn't paid and therefore never as good as homemade!

i've come to see the assembly as an art - the way everything works independently in tandem with one another with perfect timing. if that makes any sense.

i've also experimented with several different pre-packaged rice/tapioca flour mixtures and have uncovered the secret... adding 1 additional cup of water beyond what the package calls for. of course, there will always be its differences, but in my experience doing this allows for the best result for the brand. and i've come to develop my own preference... and ways to tweak it to my preferred consistency - a thin, transparent crepe-like steamed rice wrapper!

the only thing i enjoy as much as making banh cuon is experimenting with different dipping sauces to pair them with - but that's a post for another rainy day! :) mmmm! sometimes, the sauce is what keeps these little rolls of heaven interesting!


...a summer salad with a zing!


...mango and cucumber (with carrots!) salad, with a simplified twist!
here's my take on the classic "cucumber salad" that many hmong enjoy, especially during the warmer seasons when they are abundant and easily found, if not in your mum's garden then at the local farmer's markets. traditionally prepared using shredded green papaya, cucumbers have been used as a lighter - more refreshing - alternative... and so, i offer you my own simplified variation.

like any salad, there really is no wrong way to put it together, however, be cautious of how much fish sauce you splash in because it could quickly get too salty, fast. the following is how i enjoy it and i'm sure you will too! it's a perfect balance of sweet, sour, salty and just plain delicious - especially when enjoyed outdoors under the sun! :)


directions: pound garlic (and chilies) in a mortar until it's smashed well. then combine all ingredients, and mix well. serve over lettuce and... enjoy!

this recipe is very simple; a light and refreshing take from what you may be used to - if you're familiar with this dish - where the fusion of each fruit's natural juices is the secret behind the complex flavor combinations. i purposely leave out the shrimp paste(s), padaek, tamarind, etc. that i'd normally add if i was preparing it with green papaya because cucumbers contain a lot more water and therefore releases a lot more natural juices during the process in which i enjoy enhancing, rather than masking, with the addition of more subtle ingredients.

and, it doesn't hurt that i don't feel bad from consuming all the fermented and/or high-sodium ingredients found in the typical green papaya version.

2 cups shredded cucumbers
1/4 cups shredded carrots
1 cups shredded mango
1 wedge of lime
1/2 roma tomato, sliced
1 tablesppon fish sauce
1 teaspoon sugar
1/4 teaspoon msg (optional)
thai chilies (optional)

serves 2-4 people.

*this is really the only dish in which i use msg to enhance the overall flavor because of the simplicity of ingredients.
*chilies are also optional... or to preference.

*squeeze in only half the lime juice from wedge when combining all ingredients. if you prefer it a little more sour after it's all been mixed well, squeeze in the remainder.

DIY cardboard "scrap" book!

i don't know about you, but i have a pretty large arsenal of quality scrap paper (and fabrics, for that matter) that i've acquired from previous projects over the years. dub me a hoarder, but i still think they're too good to toss... plus, i keep telling myself "one day i'll use them for a really cool project!" and uhhhh'm, yeah - no. hasn't happened, ahah.

seeing them slowly accumulate in a box is not very inspiring either... especially when i have to justify keeping it around every time i reorganize. as if that weren't bad enough, with the recent holidays, cardboard boxes have also been piling up! although i'm not complaining :) thank you for thinking of me, friends, i love presents! eheh.


anywaaays, this cardboard "scrap"book project came to me, recently, like one of those over-exaggerated and animated eureka moments! while i was reorganizing my arts/crafts supplies and faced with the challenge of having to justfify my box of various scrap paper (for the nth time! or throw it away). challenge, accepted! and i ended up making this neat little cardboard [literally] scrap book in an attempt to use up what i could! <3

the first thing i did was cut the cardboard into similar sizes; it didn't need to be perfect..! :)
second, i went through my scraps and picked out the salvageable pieces :) naturally, a color scheme surfaced. 
third, i took out my scrapbooking boxes containing my letters, embellishments, ribbons, trinkets, etc... and found complimentary pieces to use in tandem with my scraps to create basic layouts and decoration.
the fourth step was going through my box of "old" photos that never made it into my traditional scrapbooks and picked out a themed-selection to use for this particular book. in this case, it was pieces of me while i lived in milwaukee, wisconsin.
after all the "pages" were put together, i drilled holes into each cardboard piece and secured it all together using twine... and might i add, i absolutely love the finished product! this was the perfect dorothy project to re-purpose leftover cardboard, use up some scraps and showcase photographs that've been sitting in a box for the last [almost] decade! it's no secret i love, love, love all things handmade :) so i'm kinda proud of this little baby. don't judge me, lols, kthxbye!